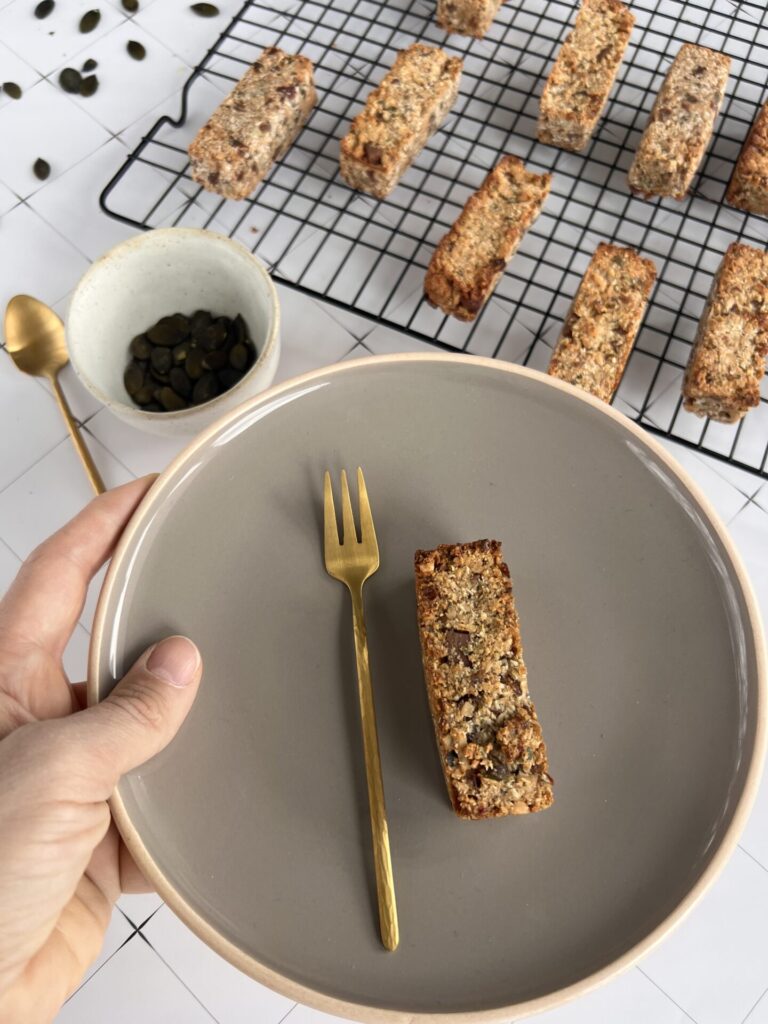
Granola bars are the perfect snack for on the go, in between meals or after exercise. But most bars available in stores are often real sugar bombs. But I got you as you can easily make healthy muesli bars yourself that are not only delicious but also sugar-free.
Here I’ll show you how healthy homemade muesli bars are, whether you can freeze them and how best to package them, and of course which ones are really delicious!
How healthy are granola bars?
Whether a granola bar is healthy depends on what you put in it. Actually makes sense, right? 😉
Therefore, homemade granola bars can be extremely healthy if you choose the right ingredients. Here you can find an overview of how to make your muesli bars healthy:
- Banana instead of sugar: Instead of refined sugar, I use ripe bananas to achieve a natural sweetness. The bananas not only provide taste, but also a pleasant consistency.
- Dates for Sweetness: Dates are a great option for adding extra sweetness. They are full of fiber and nutrients – you can see, I like them sweet 😉
- Oatmeal for satiety: Whole grain oatmeal is rich in fiber and keeps you fuller for longer. They are the basis of your muesli bars.
- Nuts and seeds for crunch: I add chopped nuts and seeds to give the bars a crunchy texture (THE crunch!) and healthy fats.
- Coconut, peanut butter, salt and cinnamon for flavor: These ingredients give the granola bars a wonderful flavor. Because coconut flakes, peanut butter, a pinch of salt and a pinch of cinnamon make your bars simply irresistible.
But what if I wanted to add some chocolate?
Then just take a *sugar-free version of chocolate drops and place a few of them on the granola bars before you bake them. Press the drops in a little and about 3-4 drops per bar taste best. As you can imagine, I have done this with chocolate drop many times. 😉 Gotta love chocolate.
But how do I get the shape?
Very easy:
Either you put the mixture in a baking pan lined with baking paper, press the mixture firmly and make sure to cut the shape of the muesli bars before baking. Or you can quickly stop by Amazon and get special * silicone molds for muesli bars. I use these and the muesli bars turn out really great with them.
So that you can choose from a small selection, you can see the top 5 from Amazon here:
No products found.
Can you freeze homemade muesli bars?
Yes, you can easily freeze homemade power bars to keep them fresh and have them on hand when needed.
It’s best to do it like this:
After baking, cut the bars into portion sizes: This makes them much easier to remove if you just need a small snack.
You can also wrap the bars individually in cling film or parchment paper: individually wrapped bars prevent annoying sticking and allow you to take out exactly the amount you need.
Place the wrapped bars in an airtight container or freezer bag: This protects the bars from nasty freezer burn and preserves their freshness.
Another little tip:
Label the packaging with the date 😉 so you can keep track of the bars’ shelf life. Because we all know what it’s like to look into the freezer and no longer know what it is or when you froze it.
And to defrost, simply take the bars you need out of the freezer and let them thaw overnight.
homeade granola bars
easy to make granola bars which taste soo good!
-
Prep time: 15 minutes -
Baking time: 25 minutes -
Total time: 40 minutes
Ingredients
| 80 g | dates |
| 2 | small bananas – ripe |
| 40 g | nuts of your choice (I like to use walnuts or pecan nuts) |
| 100 g | oats |
| 60 g | peanut butter50g coconut flakes |
| 5 g | salt |
| 0.5 | tsp cinnamon |
| optional : chocolate drops |
Utensils
- blender
- baking pan or silicon mould
Steps of preparation
- Preheat the oven to 180° top/bottom heat
- Puree the dates in the blender
- Add the remaining ingredients and mix everything together briefly
- Pour the mixture either into the mold or into the prepared baking pan
- When you put the mixture into the muesli bar shape, press it down firmly
- When you put the mixture into the baking pan, please make sure that the mixture is approx. 3cm high, otherwise the muesli bars will be too flat
- Add your chocolate drops if you want
- Bake for about 20 minutes, the corners should be slightly golden brown.
- Let them cool and enjoy
You tried this recipe?
Then link @sabrinastable on Instagram or use the hashtag #sabrinastable.
But how can you package homemade muesli bars?
The packaging of your homemade muesli bars is necessary to keep them fresh and, above all, tasty. Here are some creative options:
Resealable bags:
Use resealable bags or plastic boxes to keep the bars fresh and another bonus: then you can easily transport them.
Parchment paper and string:
Wrap your bars in parchment paper and tie them together with pretty string. This is not only environmentally friendly, but also looks beautiful.
Recycling friendly packaging:
Of course, you can also use environmentally friendly packaging options, such as reusable beeswax wraps or recyclable packaging.
So you see, healthy sugar-free muesli bars are not only delicious, but also easy to make. With the right ingredients and packaging methods, you can ensure you always have a healthy snack on hand. Be it after sport or on the go. Give it a try!
Have fun snacking and experimenting with different ingredients! 😊
love, Sabrina
Haftungsausschluss: Links, die mit einem * gekennzeichnet sind, sind Amazon-Partnerlinks. Wenn du über diese Links etwas bestellst, kann ich eine Provision erhalten. Jedoch entstehen für dich dabei keine zusätzlichen Kosten!”
Are you still looking for more baking recipes? Then take a look here.
- Pull-apart brioche Christmas tree- it’s not just children’s eyes that light up
- Healthy granola bars without sugar- a great source of energy!
- Vanilla crescents, the classic Christmas cookie
- Yogurt bread – super crispy and enjoyed by the whole family
- lavender cookies
- Australian Pavlova – a wonderful summer dessert!
- Homemade Granola- a great crunchy muesli to have in stock
- Cinnamon Apple Sheet Cake
- The best Sunday cakes for a lazy afternoon

